Git -- Introduction
Imagine you wrote some piece of code and it works to some degree. So better not change too much or, even better, make a copy to make sure you cannot screw it up. After all, if you change it and forget what you did, you might not be able to get back! And what about the other computer that I am working on? Did I copy over the latest changes or is this still running an old version? And which version did I send to a colleague?
If you had these or similar thoughts, stop worrying. git is the solution for your headaches.
It is a so-called version management tool.
These tools help software developers to track their progress while programming, establish back-ups and synchronize code between different machines.
In short, version management tools can help to
Back up your code. Version management tools like
gitwork with so-called commits. A commit is a self-contained package of work that implements a function or fixes a bug. The changes in the code are stored together with a message to make sure that the idea behind the changes can be identified later. This is a major difference between synchronization services like owncloud, Dropbox or Google Drive. These services are agnostic to the contents, they just make sure that files are identicalCollaborate with colleagues. If multiple people edit the same file, the contents have to be recombined at some point. Usually, coding at the same time does not work the same way as writing text at the same time. Nobody wants the half-written function of their colleague in their code, because you cannot test your code. Thus, powerful merge algorithms are helpful if you want to combine code at a later stage.
git(and other version management tools) provide precisely that.Share code between different computers. Services like github and gitlab are based on
git. Using these platforms, you can both, share the code privately between different machines or publish it to make it available to everyone.
There are many more advantages to using git, but let’s get into it.
TL;DR
git is a version management tool. Please use it (or some comparable tool) if you develop code to make your life (and the life of your collaborators) less painful.
Here are some important commands:
- Use
git initto transform a folder into agitrepository - Use
git add <fname>to select the files that you want to package into a commit (in git lingo: to add them to the staging area) - Use
git committo record a selection of files with a message (or in git lingo: to commit the staged changes) - Use
git pullto obtain changes form a server (pull changes from a server) - Use
git pushto send changes to a server (push changes to a server)
Git as a photo album
Learning about all commands in git is an endeavour for a lifetime.
In this blog post, we will start with the basics to get you up and running.
To understand a bit how git works, we will think about it in terms of a photo album.
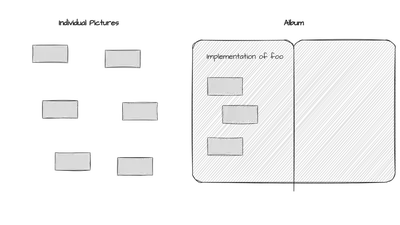
A photo album is a record of the past.
This is precisely what we are trying to achieve with git for the source code of a software.
On the one hand, we have new pictures which are not in the album yet.
Those are changes that you just performed and you are considering to bundle a couple of them into one commit.
A commit is one page of your photo album.
Each page get a title which describes the endeavour that you undertook.
In an actual album that might be “summer vacation 2023”.
In the case of git, it is most probably something like “Implementation of foo”.
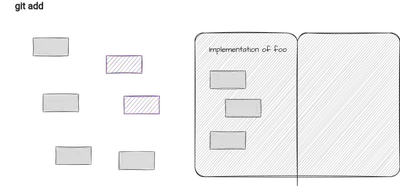
The staging area
The first step when filling a page in the photo album is the selection of the pictures to be added to the page.
This selection step is called adding in git.
A change is added to the staging area by calling git add <fname>, where <fname> is the filename of the file to be added.
Note, the chevrons have to be substituted as well. The call reads git add foo.py for the file foo.py.
The command git status will help you to identify which files are in the staging area.
It also gives a reminder about the possible commands that you can meaningfully execute.
Only changes in the staging area will be part of a commit, i.e. will go into the photo album. In the graphics, staged changes are highlighted in purple. They will be committed (aka glued) into the photo album in the next step.
In the improbable that you mistyped and figure out that a file should not be in the staging area, you can always remove it from there again with git restore --staged <fname>.
Nothing happens to your file.
git will just stop considering it for the next commit.
Committing changes
Once the pictures (changes) are selected, we have to commit them to the repository, i.e. glue them into the photo album.
With git commit all changes in the staging area are bundled into a commit and after entering a commit message, they are recorded in the git repository.
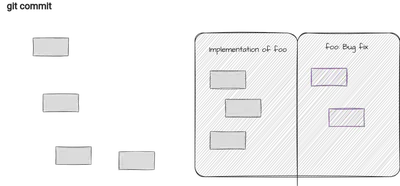
A git commit is like a named checkpoint in a game. You can always come back to a commit. In order to find it, a useful commit message is paramount. Naming a commit “Misc”, “New file” or “Another commit” is not helpful since these message are supposed to help us to identify the changes later when we need to go back.
Importantly, git can work entirely without a server, i.e. purely locally.
It does not have the added benefit of storing the code on a third server as a back-up but it still eliminates the need for files like copy_copy_final_2023-10-22_foo.py.
Regular commits relief the need for additional copies. You can always go back to a previous version of the code via git.
In case a typo made its way into the last commit message, you can always amend to the last commit.
With git commit --amend you have the possibility to open up the last commit again to add more files from the staging area or to change the title.
In terms of the metaphor: you keep working on the same page, instead of opening a new page in the album.
While everything stays local, i.e. you did not push it to a server, the whole history of the repository can be changed.
How to do that is a bit beyond the scope of this article, but you could have a look at git rebase -i, for example.
After pushing, your commits are public and you cannot change files on somebody else’s computer.
Thus, the commits are fixed.
That being said, there are some options to rewrite git history, but they are really not recommended as day-to-day practice.
Publish changes
To use git for more than just tracking of progress, but also for synchronization, back-up and collaboration, we have to transfer changes from a server to the local git repository and to a git repository on a server.
Coming back to the metaphor, this corresponds to sending new pages of the photo album to another friend. Note, she already has the photo album, since she has the git repository already. She is only missing the pages that you recently added.
In order to make the transfer of pages, you first have to make sure that you are up-to-date with her changes.
Thus, start with a git pull.
In case that she modified files that you modified as well, you will have to merge.
This is completely normal process in git and the prompts on the command line will guide you through the process.
Once everything is merged, you can git push your changes to the remote repository.
Installation
So much for the theory of git.
Let’s get our hands dirty and install git.
For Linux:
With almost absolute certainty, there is a package called git with your package manager.
For the ubuntu users a sudo apt install git will do.
For the arch users, it is sudo pacman -S git.
In case you don’t know the command for your distribution: Google does.
Windows users can find the installer here.
All commands that are given in this post are terminal commands.
In order to execute them under windows without setting up either the PowerShell or the Windows Terminal correctly, you can start Git Bash from the start menu after the installation of git.
And finally, Mac users can follow the instructions here.
Setup
After the installation, you have to tell git who you are.
After publishing, this data will public. Don’t pick an email address for the next two commands that you don’t want to be public:
git config --global user.name "<NAME>"
git config --global user.email "<EMAIL>"
Now, git knows who you are and you are ready to start working with git. You can check that git got all of it correctly with git config --list.
A git repository is nothing else than a folder with a bit of extra.
All that extra is stored in the child-folder .git.
If you execute git init in any folder, it automatically becomes a git repository.
In case to check, just execute git status.
If you know about a git repo that you would like to start with or that your group uses, you can get it via git clone <URL>.
This command will produce a folder in your current working directory with the name of the repository.
After entering that folder, you can execute git commands locally (like adding and committing).
Whether you are able to push or pull depends on your access rights of the repository.
With that being said: Happy gitting!
Do’s and Don’ts
Before we part ways, here are a couple do’s and don’ts for git.
Always
pullbefore youpush.
You cannot push to a foreign directory if you are not up-to-date. So, alwayspullbefore youpush.git statusis your best friend.gitis quite verbose in terms what it tells you about the things that you can and cannot do. If you are ever in doubt about what is currently in the staging area, etc just callgit statusand start reading.Think before you
push
Local history can always be changed and rewritten. As soon as the commits are public, this is not possible anymore. It is very common tocommitoften and onlypushoccasionally.Commit messages should be crisp, but meaningful
Commit messages are the one thing that identify a commit. They help everyone later to find a certain change. Thus, they should be meaningful and maybe contain a reference to an issue or a bug. Messages like “Misc” or “Upload file” are a horrible idea.NEVER force-
push
There are very few situations where anybody has to usegit push --force. If you think you need it, think again, ask someone and then try to avoid it. Most probably, there is a better way to do it that does not need the--forcekeyword. The most probable cause: there is apullmissing before thepush.Adhere to convention
If multiple people work on a project that you are joining, checking previous commits to adhere to conventions for commit messages might be a good idea.
Acknowledgements
While I don’t know whether this explanation in terms of a photo album is typically used in some text book, I learned about it during the Guest Student Program at the HPC center in Jülich from explanations by Ivo Kabadshow and Andreas Beckmann. This article is based on a seminar that I gave together with Yash Patel in the aQa group at Leiden University. Thank you also to Ariel Kelman for spotting a mistake in the text.
Commands in this blog post
git clone <URL>: Clone an existing repository from a given URL.git init: Initialize a folder as agitrepository.git add <fname>: Add a file to the staging area. Useful variation:git add -p <fname>to add only a part of a file.git restore --staged <fname>: Unstage a file.git commit: Commit all staged changes.git pull: Pull changes from a server.git push: Push changes to a server.
Patrick Emonts
Junior Research Group Leader
My research interests include tensor networks, lattice gauge theories and quantum information.